How to build a Workflow
The following section is a brief introduction on how to build a Workflow by using NeuroPycon package.
This example script allows to construct a pipeline to compute Power Spectral Density (PSD) in sensor space (see Compute PSD on sensor space Example).
Note
This section is based on the Nipype Tutorial
Import modules
The first step is to import the modules we need in the script. We import mainly from nipype and ephypype packages.
import os.path as op
import numpy as np
import nipype.pipeline.engine as pe
import json

import ephypype
from ephypype.nodes import create_iterator, create_datagrabber
from ephypype.datasets import fetch_omega_dataset
from ephypype.pipelines.power import create_pipeline_power
Define data and variables
Let us fetch the data first (it is around 675 MB download) and specify some variables that are specific for the data analysis (the main directories where the data are stored, the list of subjects and sessions, …)
base_path = op.join(op.dirname(ephypype.__file__), '..', 'examples')
data_path = fetch_omega_dataset(base_path)

subject_ids = ['sub-0003']
session_ids = ['ses-0001']
Now we define some variables specific for the pipelines we use (frequency band of interest, method to compute the PSD, …).
in a json file and load it in the script.
params = json.load(open("params.json"))

freq_band_names = params["power"]['freq_band_names']
freq_bands = params["power"]['freq_bands']
is_epoched = params["power"]['is_epoched']
fmin = params["power"]['fmin']
fmax = params["power"]['fmax']
power_method = params["power"]['method']
Specify Nodes
Before to create a workflow we have to create the nodes that define the workflow itself. A Node is an object that can encapsulate either an Interface to an external tool or a function defined by the user. A node can also encapsulate an another workflow.
Every Node has always at least one input and one output field: the knowledge of these inputs and outputs allows to connect the different Nodes and define the stream of input and output between them. In this example the main Nodes are
infosourceis an IdentityInterface Node that just distributes values (see Infosource)datasourceis a DataGrabber Node that allows the user to define flexible search patterns which can be parameterized by user defined inputs (see DataGrabber)power_pipelineis a Node containing the pipeline created by create_pipeline_power (see Pipeline)
Infosource
The Infosource Node allows to distributes values: when we need to feed the different subject names into the workflow we only need a Node that can receive the input and distribute those inputs to the workflow. The ephypype function create_iterator creates this Infosource Node.
infosource = create_iterator(['subject_id', 'session_id'], [subject_ids, session_ids])
The input fields of infosource node (i.e. subject_id, session_id ) are defined as iterables.
Iterables are very important for the repeated execution of a workflow with slightly changed parameters.
Indeed, Iterables are used to feed the different subject names into the workflow, and this leads to create
as many execution workflows as subjects. And depending on your system, all of those workflows could be executed in parallel.
DataGrabber
The DataGrabber Interface allows to define flexible search patterns which can be parameterized by user
defined inputs (such as subject ID, session, etc.).
In this example we parameterize the pattern search with subject_id and session_id. The ephypype function
create_datagrabber creates a node to grab data using DataGrabber in Nipype.
template_path = '*%s/%s/meg/%s*rest*0_60*ica.fif'
template_args = [['subject_id', 'session_id', 'subject_id']]
datasource = create_datagrabber(data_path, template_path, template_args)
Pipeline
Each pipeline provided by NeuroPycon requires two different kind of inputs:
inputs of the pipeline
inputnode: these particular inputs are defined after the creation of the pipeline; an inputnode of a pipeline is defined by an output of a previous Node
For example, looking at the definition of create_pipeline_power
main_path, freq_bands are inputs of the pipeline while fif_file is an inputnode. In the next section Specify Workflows and Connect Nodes we’ll see how to specify this inputnode.
To create the pipeline node we pass the input to the create_pipeline_power function:
power_workflow = create_pipeline_power(data_path, freq_bands, fmin=fmin, fmax=fmax, method=power_method, is_epoched=is_epoched)
Specify Workflows and Connect Nodes
The purpose of Workflow is to guide the sequential execution of Nodes: we create a main Workflow to connect the different Nodes and define the data flow from the outputs of one Node to the inputs of the connected Nodes. The specified connections create our workflow: the created nodes and the dependencies between them are represented as a graph (see Workflow graph), in this way it is easy to see which nodes are executed and in which order.
It is important to point out that we have to connect the output and input fields of each node to the output and input fields of another node.
First, we create our workflow and specify the base_dir which tells nipype the directory in which to store the outputs.
  power_analysis_name = 'power_workflow'

  main_workflow = pe.Workflow(name=power_analysis_name)
  main_workflow.base_dir = data_path
Then, we connect the nodes two at a time. First, we connect the two outputs (subject_id and session_id) of the infosource node to the datasource node. So, these two nodes taken together can grab data.
 main_workflow.connect(infosource, 'subject_id', datasource, 'subject_id')
 main_workflow.connect(infosource, 'session_id', datasource, 'session_id')
Finally, we connect the output of datasource node to the input node of powe pipeline node.
main_workflow.connect(datasource, 'raw_file', power_workflow, 'inputnode.fif_file')
Run Workflow
After we have specified all the nodes and connections of the workflow, the last step is to run it
by calling the run() method.
It’s also possible to generate static graphs representing nodes and connections between them
by calling write_graph() method.
If we rerun the workflow, only the nodes whose inputs have changed since the last run will be executed again. If not, it will simply return cached results. This is achieved by recording a hash of the inputs.
# run pipeline:

main_workflow.write_graph(graph2use='colored')  # colored
main_workflow.config['execution'] = {'remove_unnecessary_outputs': 'false'}
main_workflow.run(plugin='MultiProc', plugin_args={'n_procs': 2})
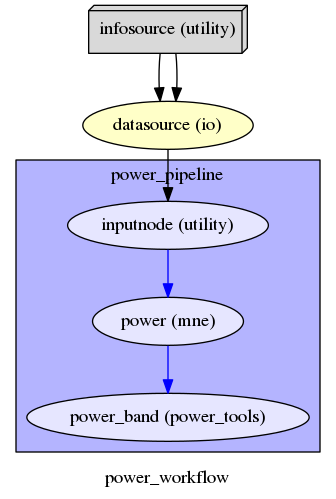
Workflow graph
Download Json parameters file: params.json
Download Python source code: plot_power.py